Ads

Showing posts with label Tips and Fixes. Show all posts

Thursday, December 22, 2022

How to Delete Multiple Postcards at Once in PokemonGO?

Thanks - or should I say, "no thanks"? - to the release of the Vivillon, all of us have been filling up our Postcard slots very very quickly, sometimes with postcards that we don't really want to keep. 

Instead of having to delete all of them one by one, you can actually delete a bunch of them at once. 

I thought this is common knowledge among PoGo players but apparently, it's not, so I thought I should make a simple how-to blog to shine a light on this super useful feature.

1. Go to your Postcards collection
2. Long press on any postcard you want to delete and then select everything else that you want to delete as well.
3. Press the Remove button at the bottom once you're done... or if you want to exit without deleting anything, simply press the "X" at the top.
4. Note that a selected postcard can be removed from the list of postcards selected simply by pressing on it once.

That's about it. Hope this helps :)


Oh and good luck on your Vivillon hunt ;)

Tuesday, November 22, 2022

How to Sleep in ZERO Sievert and Other Tips


How to Sleep in ZERO Sievert

You can sleep to quickly restore fatigue in ZERO Sievert. To do so, you can simply choose any bed at the Bunker. You get to choose how long you'd like to sleep as well. Note that time still passes - as it should - while you're at the bunker.

Extra Tip: For me, I really dislike scavenging at night, so I'll go out of my way to make sure my character sleep through the night.


How to Switch Ammo Type?

Press Y and use the mouse scroller to scroll through the list of ammo types you have. Then, - and this is important - press Y again to confirm the change. Note that your character will have to reload the gun while changing the ammo type, so make sure you're in a safe place and not in the middle of a firefight where the enemy might just be one corner away from putting multiple bullets through your body.


How to Repair Gun or Armor?

You'll need the corresponding repair kits to do so. That said,  - and this is something that I do not agree with - the amount that will be repaired as stated in the tooltip of the kit need to match the amount repairs the weapon or armor need. So, if your repair kit can repair up to 60% but the weapon/armor is at 25%, you can't use the kit on it. 

Needless to say, I'm vehemently against this kind of design. Why the hell can't I just add 60% of durability to my 25%, right? It's just mind-boggling!   


Other Tips

  1. First thing you do every time you head to a location is to mark the extraction points on your map using the custom markers. Personally, I prefer to stick around the area near to an extraction point in case I needed to make a quick getaway.
  2. Friendlies or not? Since there's really no way to know for sure, don't assume. Make sure the NPC sees you while you dodge in and out of line of sight. If they immediately start shooting, they are the enemy. Note that you can shoot friendlies in this game, accidentally or otherwise, and if you don't want to do that, you can try this tip out.
  3. Using sleep to change the time just so you don't have to scavenge during the night, which can be hard to see.
  4. You can complete quests even if the quest items needed are in your stash and not in your inventory.

Saturday, November 19, 2022

How to Use the Crafting Station in Oakenfold?


To use a Crafting Station, you'll need to fulfill all these requirements:

1. Be adjacent to the crafting station. Note that in some fights, it needs to be fully constructed before you can use it.

2. You need to have the necessary number of energy, which you can get by picking up Energy Orbs left behind by slain enemies.

3. You need to have enough time banked in the TimeBank system since it's needed to operate the crafting station.

If you have all three, then you will be able to use the Crafting Station. Hope this helps! 


A few extra tips here:

1. Once you've purchased something from the Crafting Station, it's recommended to undo the timeline until to the very beginning so you can figure out new strategies that may be more beneficial to you using the upgrades/abilities you've purchased. And no, by undoing time, you won't lose your purchase.

2. You can view what upgrades and abilities the Crafting Station of any fight offers by clicking on it BEFORE you approach it. 


Friday, March 13, 2020

Hidden Through Time (Guide/Walkthrough) - All Items Found!

Just in case you got stuck - like I did at the very end with the bank key - here's a video with all the items found.

I'll try to create a much shorter version - speed up all the unnecessary parts where I was just scanning the map for hidden objects - or just do a screenshot version :)

Have fun!

Check out my full review here
Updated guide here.


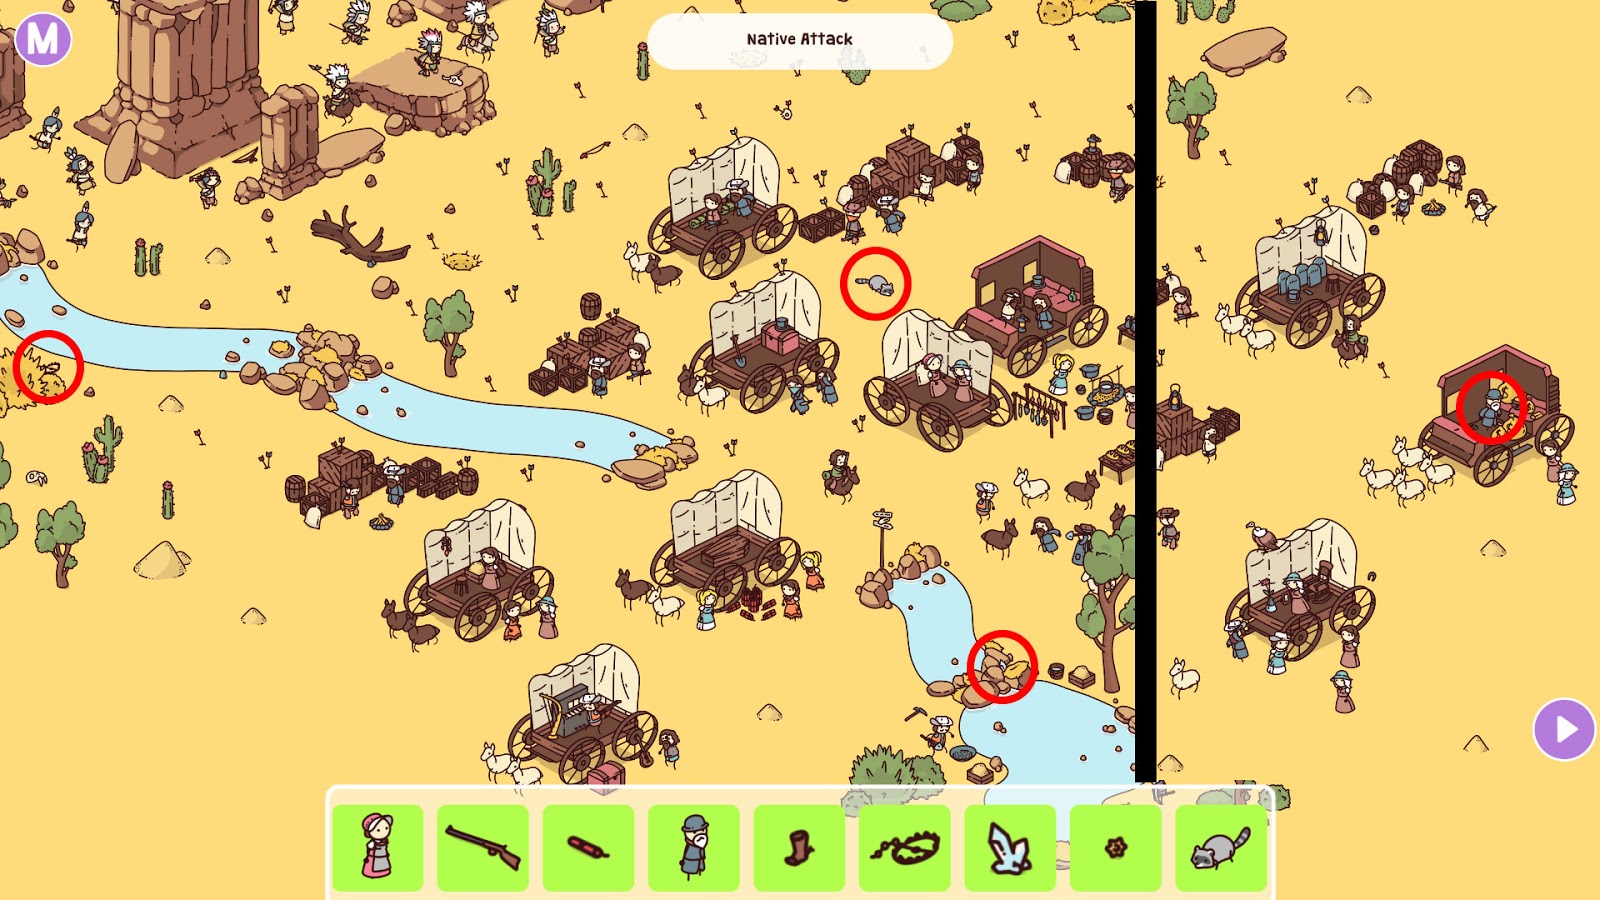
Picture guide for Hidden Through Time :) Just look for the red circles!

Level 1 - T-Rex Attack

Click to enlarge

Level 2 - Village

Click to enlarge

Level 3 - Gathering

Click to enlarge

Level 4 - Rock Expo

Click to enlarge

Click to enlarge

Click to enlarge

Level 5 - Zoo

Click to enlarge

Click to enlarge

Click to enlarge

Level 6 - Hunting Party

Click to enlarge

Click to enlarge

Click to enlarge

click to enlarge

Level 7 - Small Market

click to enlarge

Level 8 - The Beach

Click to enlarge

Level 9 - Wrath of Anubis

click to enlarge

click to enlarge

Level 10 - The Judgement of Osiris

click to enlarge

Level 11 - Queen's Birthday

click to enlarge

click to enlarge

Level 12 - The Great Pyramid

click to enlarge

click to enlarge

Level 13 - The City

click to enlarge

click to enlarge

Level 14 - Royal Wedding

click to enlarge

click to enlarge

Level 15 - Dungeon

Click to enlarge

Level 16 - Market Place

click to enlarge

click to enlarge

click to enlarge

click to enlarge


Level 17 - Ambush

Click to enlarge

Level 18 - Stone Henge

Click to enlarge

Level 19 - Jousting Tournament

click to enlarge

click to enlarge

click to enlarge

Level 20 - Castle Attack

click to enlarge

click to enlarge

Level 21 - Train Station

Click to enlarge

Level 22 - The Bank

click to enlarge

Level 23 - Native Attack

click to enlarge
click to enlarge


Level 24 - Western Town

click to enlarge

click to enlarge

click to enlarge

Level 25 - The Gold Rush

click to enlarge

Level 26 - The Native Village

click to enlarge

click to enlarge

click to enlarge

click to enlarge

click to enlarge

click to enlarge

click to enlarge

click to enlarge